Tuesday, February 23, 2016

Tips for Saving Money (on a small income!)


Everyone is always looking for more ways to save a little money. In mine and hubby's stage of life, saving money on a not-so-large income has played a huge role in reaching our goals (starting a family, buying a home). So I thought I'd share a few tips we've learned about saving money and frugal living.

  • Make a budget: Start off by writing down what you typically spend money on throughout the month. This will probably include: rent/mortgage, utilities/gas bills, food (groceries & eating out),  internet, T.V., gas, car insurance, phone, health insurance, and don't forget some play money. Nate and I also include tithing and fast offerings in our budget. Add up the expenses and subtract them from your income, and you will see how much you can save per month. If you don't like what you see and want to save more money, find areas that you can cut back on. Examples: eating out, shopping, do you really need 1,000 channels?  Set a limit to the spending in areas you can control and stick with it. 
  • Don't buy what you can't afford: Hubby and I never purchase anything we can't afford with cash at that time, which in return = no debt. 
  • Don't spend on what you don't need: use the 24 hr, week, or one month rule to prevent you from spending on things you don't need or splurging. When you think you really want to buy something, wait 24 hrs, one week, or one month before you purchase it. In most cases, you won't end up buying whatever it is you wanted, which means more money saved. 
  • DIY: Since moving into our home we've wanted to make a couple updates and changes, like... painting the kitchen (which would have cost a couple thousand dollars for someone else to do it), updating the fireplace, and adding board a board and batten wall to the entryway. We've also built some furniture for our home instead of buying it (these will be shared in posts coming soon!). We have saved $4,000 just by building our own furniture... something to think about! 
  • Couponing and searching good deals: No, I am not an extreme couponer but I do try to find good deals to go along with a few coupons I cut. You do have to search around a little to see if there are items on sale that you also have coupons for. For example, just last week I had two coupons for cereal, plus the kind of cereal was on a major sale, so I got 6 boxes of cereal for $6. I felt pretty proud of myself and that saved us $15 just on cereal!

These are pretty simple! Anyone can do them. Some of them may take a little extra time and effort but they are well worth it. 

What are things you do to help you save money?

Monday, February 8, 2016

Peter Pan Baby Shower


Last week I had the opportunity to host a baby shower for one of my really good friends! It was so much fun! I knew she had been planning a Peter Pan nursery for her home so a Peter Pan themed shower seemed like the perfect idea!

Although the theme for the shower is popular for children's parties, I wanted to give it a classy feel!


Early on I had an idea to make a map of Neverland out of the table cloth! The table cloth was just some brown paper from Home Depot that I already had on hand from our many projects. 


All I did was find a picture of a Neverland map online and freehanded everything the best I could, I love how it turned out! 


I also added some props of things you would see in Peter Pan like... a clock, blocks, and teddy bear. 


Now lets not forget about the food, look at these adorable cupcakes my cousin made with Peter Pan hats on them! 


We also added to the Peter Pan theme by hanging gold stars above the buffet table. 


And here are a couple more pictures because it was pretty... 


Tuesday, December 1, 2015

DIY Fireplace Mantle and Shiplap


When we first bought our house everything was DARK, DARK, DARK. The mantle, stair railings, kitchen... and with my new obsession with HGTV's Fixer Upper, I knew I wanted to make everything light! When I saw the episode of the shiplap fireplace I knew it had to be done in my house! 


Here is what our mantle looked like before we started.
First we sanded down the mantle. Then nailed up the shiplap boards onto the wall (into the studs of course). We then filled in all the nail holes with spackle and once dried, sanded the spackle down so it was a smooth surface. 


We were then ready for the primer. Before you put on the primer, make sure to clean all the surfaces very well. We used a vacuum hose and then some tack cloth to make sure we cleaned up all the excess dust. 

After the primer dried, we lightly sanded the surfaces that had been primed. Remember to clean the surfaces again after this step.


Then we went ahead and painted the boards and mantle white. We used two coats of paint on the shiplap and 3 on the mantle because it was so dark. It has made a huge difference in our home and makes the room feel so much bigger and taller!

More pics just for fun...


DIY Star Wars Halloween Costume


Are you looking for cheap and easy DIY Halloween costumes? This R2D2 costume was super easy, cheap and ADORABLE! 

What you need is:
-white baby onesie
-sharpies
-tulle (if wanting to make a skirt)
-piece of fabric or elastic for tulle skirt
-hat (I found this one at Walmart for 98 cents!)


We started off by finding a picture of R2D2 and just drawing it onto the onesie with a sharpie. Make sure you put something inside the onesie so the ink doesn't leak onto the back. 

To make the tulle skirt I just tied the tulle around a piece of fabric I already had. Then we tied the piece of fabric around baby's waist. 


Put on a hat and you've got it! 

Tuesday, October 6, 2015

DIY Board and Batten Wall


When we first bought our house I didn't think much about the giant blank wall in the entry way. It wasn't until the decorating began that I had no idea what to do with it! At first I thought about a bench or a giant mirror on the wall but the entry way is too small to add much that sticks out. If I just had a mirror sitting there, that probably wouldn't work well with kiddos, and we were expecting our first. Then I remembered a house that I loved while house hunting but was too pricey. It had board and batten in the entry way and I absolutely loved it! *LIGHTBULB* 


So we ran over to home depot, and got some boards cut to fit our wall. 


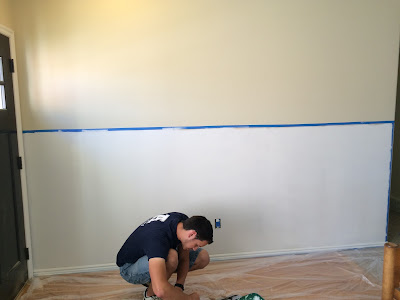
Then we taped the boards up on the wall where we wanted them. (This ended up changing when we decided against nail glue and went just for nailing the boards into studs.)


Getting all prepped for the paint! Instead of having batten on the wall we just decided to paint the wall. It made this project a little more budget friendly. 


Hooray, the wall was painted! 


Maybe you will notice that our baseboards look a little different. Instead of going with a whole new baseboard, we bought a strip of a quarter round piece. It added just a little bit more height to the baseboard and it created a flat piece for the boards to rest on top of. 

We filled in the nail holes and painted the boards and baseboards. Now all we need is a cute mirror and some pictures hung over the board and batten, then... TADA! 


Thursday, October 1, 2015

Thanksgiving Turkey Shape Craft


This is one of my favorite Thanksgiving crafts to make! For one, it is super cute, and two, it's a great way to practice identifying shapes and/or colors! I would make this craft with my students at the beginning of November and would put them on my bulletin board with a saying "We're Shaping Up For Fall!"
What you need:
  1. Different colored diamonds (feathers)
  2. Orange and yellow triangles (beaks and feet)
  3. Brown ovals
  4. Googley eyes
  5. Glue
I have templates for the shapes that you can use to print out and cut. You can find them on my teachers pay teachers store (Free) here:

The shapes are ready to print and be cut out. If you have students who can cut themselves then you can let them cut out their own! If you have students who have a harder time cutting on skinny lines, I recommend drawing over the line with a thick marker to make the line bigger, which should make it easier for them to cut out the shapes. You may have students who need the shapes previously cut out for them. I had one or two students in my class who could cut out their own shapes but the rest of the students needed them previously cut. 
Happy Thanksgiving!

Sunday, September 27, 2015

Baby Nursery


Photo cred: kelseyhadleyphotography
Photo Cred: kelseyhadleyphotography

Photo Cred: kelseyhadleyphotography


Baby Hawkes is now 4 months old but this nursery is still as cute as ever! It was such a fun project to work on! 
  • Crib: Emerson from Pottery Barn Kids
  • Bunny and Fox pictures: Target
  • Glider/Recliner: Homegoods-sidenote, I was so worried about getting a white chair for the nursery because there was so much white already, but with some experimentation with pillows and blankets it has been perfect!
  • Gold Side Table: Homegoods
  • Lamp: Target
  • Pillows and Blanket on Chair: Homegoods
  • Sheepskin Rug: Homegoods
  • Sheep Crib Sheet and Changing Pad Cover: Land of Nod
  • Mobile: DIY project! Tutorial here.
  • Dresser: Awesome DI find and the hubby refinished it! See the before and after here.
  • Quilt: DIY project! Look here for more info.
  • Vase/Flowers: Michaels (everything I got from Michaels was 50% off, it was a score!)