Tuesday, December 1, 2015

DIY Fireplace Mantle and Shiplap


When we first bought our house everything was DARK, DARK, DARK. The mantle, stair railings, kitchen... and with my new obsession with HGTV's Fixer Upper, I knew I wanted to make everything light! When I saw the episode of the shiplap fireplace I knew it had to be done in my house! 


Here is what our mantle looked like before we started.
First we sanded down the mantle. Then nailed up the shiplap boards onto the wall (into the studs of course). We then filled in all the nail holes with spackle and once dried, sanded the spackle down so it was a smooth surface. 


We were then ready for the primer. Before you put on the primer, make sure to clean all the surfaces very well. We used a vacuum hose and then some tack cloth to make sure we cleaned up all the excess dust. 

After the primer dried, we lightly sanded the surfaces that had been primed. Remember to clean the surfaces again after this step.


Then we went ahead and painted the boards and mantle white. We used two coats of paint on the shiplap and 3 on the mantle because it was so dark. It has made a huge difference in our home and makes the room feel so much bigger and taller!

More pics just for fun...


DIY Star Wars Halloween Costume


Are you looking for cheap and easy DIY Halloween costumes? This R2D2 costume was super easy, cheap and ADORABLE! 

What you need is:
-white baby onesie
-sharpies
-tulle (if wanting to make a skirt)
-piece of fabric or elastic for tulle skirt
-hat (I found this one at Walmart for 98 cents!)


We started off by finding a picture of R2D2 and just drawing it onto the onesie with a sharpie. Make sure you put something inside the onesie so the ink doesn't leak onto the back. 

To make the tulle skirt I just tied the tulle around a piece of fabric I already had. Then we tied the piece of fabric around baby's waist. 


Put on a hat and you've got it! 

Tuesday, October 6, 2015

DIY Board and Batten Wall


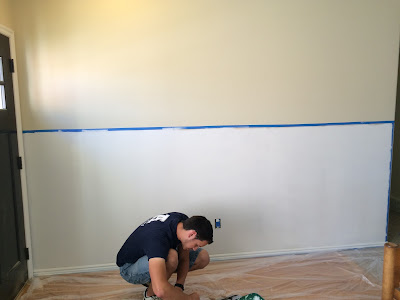
When we first bought our house I didn't think much about the giant blank wall in the entry way. It wasn't until the decorating began that I had no idea what to do with it! At first I thought about a bench or a giant mirror on the wall but the entry way is too small to add much that sticks out. If I just had a mirror sitting there, that probably wouldn't work well with kiddos, and we were expecting our first. Then I remembered a house that I loved while house hunting but was too pricey. It had board and batten in the entry way and I absolutely loved it! *LIGHTBULB* 


So we ran over to home depot, and got some boards cut to fit our wall. 


Then we taped the boards up on the wall where we wanted them. (This ended up changing when we decided against nail glue and went just for nailing the boards into studs.)


Getting all prepped for the paint! Instead of having batten on the wall we just decided to paint the wall. It made this project a little more budget friendly. 


Hooray, the wall was painted! 


Maybe you will notice that our baseboards look a little different. Instead of going with a whole new baseboard, we bought a strip of a quarter round piece. It added just a little bit more height to the baseboard and it created a flat piece for the boards to rest on top of. 

We filled in the nail holes and painted the boards and baseboards. Now all we need is a cute mirror and some pictures hung over the board and batten, then... TADA! 


Thursday, October 1, 2015

Thanksgiving Turkey Shape Craft


This is one of my favorite Thanksgiving crafts to make! For one, it is super cute, and two, it's a great way to practice identifying shapes and/or colors! I would make this craft with my students at the beginning of November and would put them on my bulletin board with a saying "We're Shaping Up For Fall!"
What you need:
  1. Different colored diamonds (feathers)
  2. Orange and yellow triangles (beaks and feet)
  3. Brown ovals
  4. Googley eyes
  5. Glue
I have templates for the shapes that you can use to print out and cut. You can find them on my teachers pay teachers store (Free) here:

The shapes are ready to print and be cut out. If you have students who can cut themselves then you can let them cut out their own! If you have students who have a harder time cutting on skinny lines, I recommend drawing over the line with a thick marker to make the line bigger, which should make it easier for them to cut out the shapes. You may have students who need the shapes previously cut out for them. I had one or two students in my class who could cut out their own shapes but the rest of the students needed them previously cut. 
Happy Thanksgiving!

Sunday, September 27, 2015

Baby Nursery


Photo cred: kelseyhadleyphotography
Photo Cred: kelseyhadleyphotography

Photo Cred: kelseyhadleyphotography


Baby Hawkes is now 4 months old but this nursery is still as cute as ever! It was such a fun project to work on! 
  • Crib: Emerson from Pottery Barn Kids
  • Bunny and Fox pictures: Target
  • Glider/Recliner: Homegoods-sidenote, I was so worried about getting a white chair for the nursery because there was so much white already, but with some experimentation with pillows and blankets it has been perfect!
  • Gold Side Table: Homegoods
  • Lamp: Target
  • Pillows and Blanket on Chair: Homegoods
  • Sheepskin Rug: Homegoods
  • Sheep Crib Sheet and Changing Pad Cover: Land of Nod
  • Mobile: DIY project! Tutorial here.
  • Dresser: Awesome DI find and the hubby refinished it! See the before and after here.
  • Quilt: DIY project! Look here for more info.
  • Vase/Flowers: Michaels (everything I got from Michaels was 50% off, it was a score!)

Baby Quilt Tutorial


I love to make quilts, especially BABY quilts! So when I was expecting I went on the hunt to find the perfect one. I found this super cute quilt tutorial here


Picking out the fabric for this quilt was so hard for me! I knew I wanted some bluish, minty colors along with some coral and neutrals. I searched multiple stores and almost gave up on the last one but by some miracle started making connections with fabrics at the last minute!  

I have to give a lot of credit to my amazing grandma on this quilt, she pushed me to get it done just a week and half before baby H was born! She also did a lot of the hard work with cutting, pressing, etc. She let me just sit in a chair with my big belly and sew my heart out. 


Once all the blocks were made I lined everything up how I wanted it before sewing it into rows. I also ended up making a little smaller quilt than in the tutorial but I think it turned out to be the perfect size!

Once the top was ready I went ahead and freehanded the quilting-only took about an hour, it was fabulous! All that is left is the binding and it's done.

So happy with how cute it turned out! 

Thursday, September 24, 2015

DIY Refinished Dresser


When looking for the dresser for the nursery I wanted something that looked a little more old fashioned. I told my awesome aunt who is the best bargain shopper I've ever met and she quickly snatched this up! This dresser was a steal and it even had a huge mirror that went above it! We had to fix a few drawers but that was easy. 

This is originally how it looked and we decided we wanted to paint it to give it a cleaner look. So we went to work with sanding... and sanding.. and a little bit more sanding... We then had to strip the rest of the paint off of it. 

BEFORE

Once the paint was stripped we were ready to go for the painting. The hubby was a champ! This was not an easy project to paint. 


The handles on the dresser were originally gold colored, but were super dirty, so I found a tutorial online of how to clean them... and it didn't work. So we went to the next best thing and spray painted all of the handles gold. They looked perfect!

AFTER
And...this is how it looked after it was all put together! TADA!

Wednesday, September 23, 2015

DIY Flower Nursery Mobile


When I was first designing the nursery, I looked around for all sorts of ideas. When shopping for a mobile to go over the crib everything I saw was SO expensive. With me needing to quit my job due to pregnancy complications, we were putting together this nursery on a budget! I was inspired by a picture of a mobile I saw on an Etsy shop (the mobile was over $100!!). So I decided I needed to do it myself, which I did, for $5. That's right, $5! 

I headed to the craft store, bought 5 blocks of felt, each costing 20 cents. I bought a little container of pearls and that was all I needed. I had leftover wreath material from a different project and I used fishing line I already had to string the mobile. 

I found a template for the felt flowers on Pinterest here.

Cut out the felt in the shape of the template. Once cut, start by rolling the felt from the outside in and occasionally put a dot of hot glue in there while rolling. When you get to the middle, hot glue the middle piece to the bottom of the flower. (The cutting can take a long time.. I recommend turning on netflix and going at it!) 

Once I had my flowers made I cut fishing line to the length I wanted it (you can decide that too). Then I taped the line to a hard surface so it was easier to control. I then used a needle to thread the fishing line through the center of the flowers and pearls. I would recommend tying a knot or putting a dot of glue near the center of the flower when on the proper place in the line so it doesn't slide down. 

You can design your mobile strings however you want. I didn't make my strings all the same length. Some have 4 flowers on them, some 3, some 2. Some started at the top with a pearl, some started at the top with a flower. It was fun to make it random. 

Once all my flowers and pearls were threaded I tied the strands to the wreath. Then I hung it from the ceiling using more fishing line... and TADA!

Photo Cred: kelseyhadleyphotography